|
|
Iptables |
|
| Home | Contents | Contact Us |
| Contents » Example scripts | Printer friendly version |
|
Permission is granted to copy, distribute and/or modify this document under the terms of the GNU Free Documentation License, Version 1.1; with the Invariant Sections being "Introduction" and all sub-sections, with the Front-Cover Texts being "Original Author: Oskar Andreasson", and with no Back-Cover Texts. A copy of the license is included in the section entitled "GNU Free Documentation License". All scripts in this tutorial are covered by the GNU General Public License. The scripts are free source; you can redistribute them and/or modify them under the terms of the GNU General Public License as published by the Free Software Foundation, version 2 of the License. These scripts are distributed in the hope that they will be useful, but WITHOUT ANY WARRANTY; without even the implied warranty of MERCHANTABILITY or FITNESS FOR A PARTICULAR PURPOSE. See the GNU General Public License for more details. You should have received a copy of the GNU General Public License within this tutorial, under the section entitled "GNU General Public License"; if not, write to the Free Software Foundation, Inc., 59 Temple Place, Suite 330, Boston, MA 02111-1307 USA |
Chapter 14. Example scripts
The objective of this chapter is to give a fairly brief and short explanation of each script available with this tutorial, and to provide an overview of the scripts and what services they provide. These scripts are not in any way perfect, and they may not fit your exact intentions perfectly. It is, in other words, up to you to make these scripts suitable for your needs. The rest of this tutorial should most probably be helpful in making this feat. The first section of this tutorial deals with the actual structure that I have established in each script so we may find our way within the script a bit easier.
rc.firewall.txt script structure |
Page Up |
All scripts written for this tutorial have been written after a specific structure. The reason for this is that they should be fairly similar to each other and to make it easier to find the differences between the scripts. This structure should be fairly well documented in this brief chapter. This chapter should hopefully give a short understanding to why all the scripts have been written as they have, and why I have chosen to maintain this structure.
 |
Even though this is the structure I have chosen, do note that this may not be the best structure for your scripts. It is only a structure that I have chosen to use since it fits the need of being easy to read and follow the best according to my logic. |
The structure
This is the structure that all scripts in this tutorial should follow. If they differ in some way it is probably an error on my part, unless it is specifically explained why I have broken this structure.
-
Configuration - First of all we have the configuration options which the rest of the script should use. Configuration options should pretty much always be the first thing in any shell-script.
-
Internet - This is the configuration section which pertains to the Internet connection. This could be skipped if we do not have any Internet connection. Note that there may be more subsections than those listed here, but only such that pertain to our Internet connection.
-
DHCP - If there are possibly any special DHCP requirements with this specific script, we will add the DHCP specific configuration options here.
-
PPPoE - If there is a possibility that the user that wants to use this specific script, and if there are any special circumstances that raises the chances that he is using a PPPoE connection, we will add specific options for those here.
-
-
LAN - If there is any LAN available behind the firewall, we will add options pertaining to that in this section. This is most likely, hence this section will almost always be available.
-
DMZ - If there is any reason to it, we will add a DMZ zone configuration at this point. Most scripts lacks this section, mainly because any normal home network, or small corporate network, will not have one.
-
Localhost - These options pertain to our localhost. These variables are highly unlikely to change, but we have put most of it into variables anyway. Hopefully, there should be no reason to change these variables.
-
iptables - This section contains iptables specific configuration. In most scripts and situations this should only require one variable which tells us where the iptables binary is located.
-
Other - If there are any other specific options and variables, they should first of all be fitted into the correct subsection (If it pertains to the Internet connection, it should be sub-sectioned there, etc). If it does not fit in anywhere, it should be sub-sectioned directly to the configuration options somewhere.
-
-
Module loading - This section of the scripts should maintain a list of modules. The first part should contain the required modules, while the second part should contain the non-required modules.
Note that some modules that may raise security, or add certain services or possibilities, may have been added even though they are not required. This should normally be noted in such cases within the example scripts.
As of the later iptables versions, modules are automatically loaded and most module loading should not be required, but from a control perspective, it is better to load the modules on your own. For example, the conntrack helpers are never automatically loaded.
-
Required modules - This section should contain the required modules, and possibly special modules that add to the security or add special services to the administrator or clients.
-
Non-required modules - This section contains modules that are not required for normal operations. All of these modules should be commented out per default, and if you want to add the service it provides, it is up to you.
-
-
proc configuration - This section should take care of any special configuration needed in the proc file system. If some of these options are required, they will be listed as such, if not, they should be commented out per default, and listed under the non-required proc configurations. Most of the useful proc configurations will be listed here, but far from all of them.
-
Required proc configuration - This section should contain all of the required proc configurations for the script in question to work. It could possibly also contain configurations that raise security, and possibly which add special services or possibilities for the administrator or clients.
-
Non-required proc configuration - This section should contain non-required proc configurations that may prove useful. All of them should be commented out, since they are not actually necessary to get the script to work. This list will contain far from all of the proc configurations or nodes.
-
-
Rules set up - By now the scripts should most probably be ready to insert the rule-set. I have chosen to split all the rules down after table and then chain names in the rule-sets, to make them easier to follow and read. All user specified chains are created before we do anything to the system built in chains. I have also chosen to set the chains and their rule specifications in the same order as they are output by the iptables -L command.
-
Filter table - First of all we go through the filter table and its content. First of all we should set up all the policies in the table.
-
Set policies - Set up all the default policies for the system chains. Normally I will set DROP policies on the chainsa in the filter table, and specifically ACCEPT services and streams that I want to allow inside. This way we will get rid of all ports that we do not want to let people use.
-
Create user specified chains - At this point we create all the user specified chains that we want to use later on within this table. We will not be able to use these chains in the system chains anyway if they are not already created so we might as well get to it as soon as possible.
-
Create content in user specified chains - After creating the user specified chains we may as well enter all the rules within these chains. The only reason I have to enter this data at this point already is that you may as well put it close to the creation of the user specified chains. You may as well put this later on in your script, it is totally up to you.
-
INPUT chain - When we have come this far, we do not have a lot of things left to do within the filter table so we get onto the INPUT chain. At this point we should add all rules within the INPUT chain.
At this point we start following the output from the iptables -L command as you may see. There is no reason for you to stay with this structure, however, do try to avoid mixing up data from different tables and chains since it will become much harder to read such rule-sets and to fix possible problems.
-
FORWARD chain - At this point we go on to add the rules within the FORWARD chain. Nothing special about this decision.
-
OUTPUT chain - Last of all in the filter table, we add the rules dealing with the OUTPUT chain. There should, hopefully, not be too much to do at this point.
-
-
nat table - After the filter table we take care of the nat table. This is done after the filter table because of a number of reasons within these scripts. First of all we do not want to turn the whole forwarding mechanism and NAT function on at too early a stage, which could possibly lead to packets getting through the firewall at just the wrong time point (i.e., when the NAT has been turned on, but none of the filter rules has been run). Also, I look upon the nat table as a sort of layer that lies just outside the filter table and kind of surrounds it. The filter table would hence be the core, while the nat table acts as a layer lying around the filter table, and finally the mangle table lies around the nat table as a second layer. This may be wrong in some perspectives, but not too far from reality.
-
Set policies - First of all we set up all the default policies within the nat table. Normally, I will be satisfied with the default policy set from the beginning, namely the ACCEPT policy. This table should not be used for filtering anyways, and we should not let packets be dropped here since there are some really nasty things that may happen in such cases due to our own presumptions. I let these chains be set to ACCEPT since there is no reason not to do so.
-
Create user specified chains - At this point we create any user specified chains that we want within the nat table. Normally I do not have any of these, but I have added this section anyways, just in case. Note that the user specified chains must be created before they can actually be used within the system chains.
-
Create content in user specified chains - By now it should be time to add all the rules to the user specified chains in the nat table. The same thing goes here as for the user specified chains in the filter table. We add this material here since I do not see any reason not to.
-
PREROUTING chain - The PREROUTING chain is used to do DNAT on packets in case we have a need for it. In most scripts this feature is not used, or at the very least commented out. The reason being that we do not want to open up big holes to our local network without knowing about it. Within some scripts we have this turned on by default since the sole purpose of those scripts is to provide such services.
-
POSTROUTING chain - The POSTROUTING chain should be fairly well used by the scripts I have written since most of them depend upon the fact that you have one or more local networks that we want to firewall against the Internet. Mainly we will try to use the SNAT target, but in certain cases we are forced to use the MASQUERADE target instead.
-
OUTPUT chain - The OUTPUT chain is barely used at all in any of the scripts. As it looks now, it is not broken, but I have been unable to find any good reasons to use this chain so far. If anyone has a reason to use this chain, send me a line and I will add it to the tutorial.
-
-
mangle table - The last table to do anything about is the mangle table. Normally I will not use this table at all, since it should normally not be used for anyone, unless they have specific needs, such as masking all boxes to use the exact same TTL or to change TOS fields etc. I have in other words chosen to leave these parts of the scripts more or less blank, with a few exceptions where I have added a few examples of what it may be used for.
-
Set policies - Set the default policies within the chain. The same thing goes here as for the nat table, pretty much. The table was not made for filtering, and hence you should avoid it alltogether. I have not set any policies in any of the scripts in the mangle table one way or the other, and you are encouraged not to do so either.
-
Create user specified chains - Create all the user specified chains. Since I have barely used the mangle table at all in the scripts, I have neither created any chains here since it is fairly unusable without any data to use within it. However, this section was added just in case someone, or I, would have the need for it in the future.
-
Create content in user specified chains - If you have any user specified chains within this table, you may at this point add the rules that you want within them here.
-
PREROUTING - At this point there is barely any information in any of the scripts in this tutorial that contains any rules here. Basically, the PREROUTING chain can be used to set netfilter, routing and SEC marks, both on a per packet basis and on a per connection basis.
-
INPUT chain - The INPUT chain is barely used in the current scripts of the tutorial, but it could be used for mark handling for example.
-
FORWARD chain - The FORWARD chain of the mangle table can be used for mark handling and for mangling packet headers of packets that are traveling across the firewall in question. Changing TTL and TOS for example.
-
OUTPUT chain - The OUTPUT chain could be used to mangle the packets leaving the firewall or host itself, for example setting different marks or setting TTL or TOS values. This is not done in most of the scripts here, but the section has been added however.
-
POSTROUTING chain - This chain is basically not in use by any of the scripts in the tutorial as of writing this, but it could be used to setting values for all packets leaving both the host or firewall itself, and traffic traversing the machine. For example, it could be used to reset the MTU of packets, set TTL or TOS et cetera.
-
-
Hopefully this should explain more in detail how each script is structured and why they are structured in such a way.
 |
Do note that these descriptions are extremely brief, and should mainly just be seen as a brief explanation to what and why the scripts have been split down as they have. There is nothing that says that this is the only and best way to go. |
rc.firewall.txt |
Page Up |

The rc.firewall.txt script is the main core on which the rest of the scripts are based upon. The rc.firewall file chapter should explain every detail in the script most thoroughly. Mainly it was written for a dual homed network. For example, where you have one LAN and one Internet Connection. This script also makes the assumption that you have a static IP to the Internet, and hence don't use DHCP, PPP, SLIP or some other protocol that assigns you an IP automatically. If you are looking for a script that will work with those setups, please take a closer look at the rc.DHCP.firewall.txt script.
The rc.firewall.txt script requires the following options to be compiled statically to the kernel, or as modules. Without one or more of these, the script will become more or less flawed since parts of the script's required functionalities will be unusable. As you change the script you use, you could possibly need more options to be compiled into your kernel depending on what you want to use.
-
CONFIG_NETFILTER
-
CONFIG_IP_NF_CONNTRACK
-
CONFIG_IP_NF_IPTABLES
-
CONFIG_IP_NF_MATCH_LIMIT
-
CONFIG_IP_NF_MATCH_STATE
-
CONFIG_IP_NF_FILTER
-
CONFIG_IP_NF_NAT
-
CONFIG_IP_NF_TARGET_LOG
rc.DMZ.firewall.txt |
Page Up |
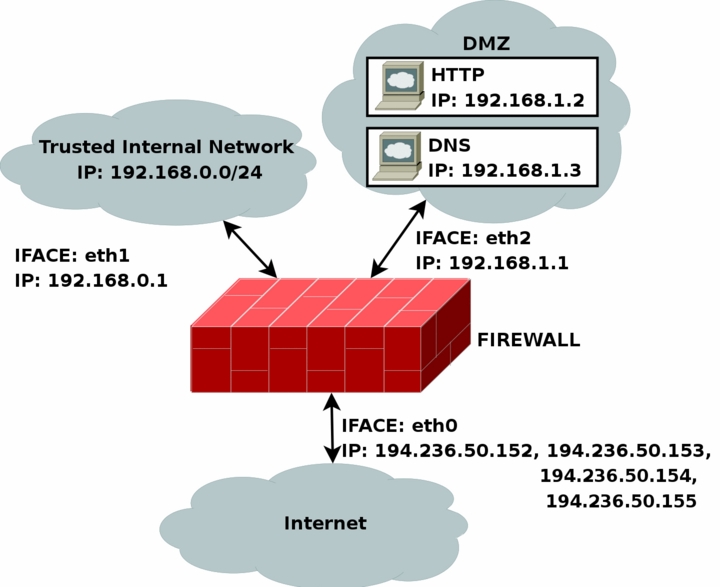
The rc.DMZ.firewall.txt script was written for those people out there that have one Trusted Internal Network, one De-Militarized Zone and one Internet Connection. The De-Militarized Zone is in this case 1-to-1 NATed and requires you to do some IP aliasing on your firewall, i.e., you must make the box recognize packets for more than one IP. There are several ways to get this to work, one is to set 1-to-1 NAT, another one if you have a whole subnet is to create a subnetwork, giving the firewall one IP both internally and externally. You could then set the IP's to the DMZed boxes as you wish. Do note that this will "steal" two IP's for you, one for the broadcast address and one for the network address. This is pretty much up to you to decide and to implement. This tutorial will give you the tools to actually accomplish the firewalling and NATing part, but it will not tell you exactly what you need to do since it is out of the scope of the tutorial.
The rc.DMZ.firewall.txt script requires these options to be compiled into your kernel, either statically or as modules. Without these options, at the very least, available in your kernel, you will not be able to use this scripts functionality. You may in other words get a lot of errors complaining about modules and targets/jumps or matches missing. If you are planning to do traffic control or any other things like that, you should see to it that you have all the required options compiled into your kernel there as well.
-
CONFIG_NETFILTER
-
CONFIG_IP_NF_CONNTRACK
-
CONFIG_IP_NF_IPTABLES
-
CONFIG_IP_NF_MATCH_LIMIT
-
CONFIG_IP_NF_MATCH_STATE
-
CONFIG_IP_NF_FILTER
-
CONFIG_IP_NF_NAT
-
CONFIG_IP_NF_TARGET_LOG
You need to have two internal networks with this script as you can see from the
picture. One uses IP range 192.168.0.0/24 and consists of a Trusted Internal Network.
The other one uses IP range 192.168.1.0/24 and consists of the De-Militarized Zone
which we will do 1-to-1 NAT to. For example, if someone from the Internet sends
a packet to our DNS_IP, then we use DNAT to send the
packet on to our DNS on the DMZ network. When the DNS sees our packet, the packet
will be destined for the actual DNS internal network IP, and not to our external
DNS IP. If the packet would not have been translated, the DNS wouldn't have answered
the packet. We will show a short example of how the DNAT code looks:
$IPTABLES -t nat -A PREROUTING -p TCP -i $INET_IFACE -d $DNS_IP \
--dport 53 -j DNAT --to-destination $DMZ_DNS_IP
First of all, DNAT can only be performed in the PREROUTING chain of the nat table.
Then we look for TCP protocol on our $INET_IFACE with
destination IP that matches our $DNS_IP, and is directed
to port 53, which is the TCP port for zone transfers between name servers. If we
actually get such a packet we give a target of DNAT. After that we specify where
we want the packet to go with the --to-destination option and give it the value
of $DMZ_DNS_IP, in other words the IP of the DNS on
our DMZ network. This is how basic DNAT works. When the reply to the DNATed packet
is sent through the firewall, it automatically gets un-DNATed.
By now you should have enough understanding of how everything works to be able to understand this script pretty well without any huge complications. If there is something you don't understand that hasn't been gone through in the rest of the tutorial, mail me since it is probably a fault on my side.
rc.DHCP.firewall.txt |
Page Up |
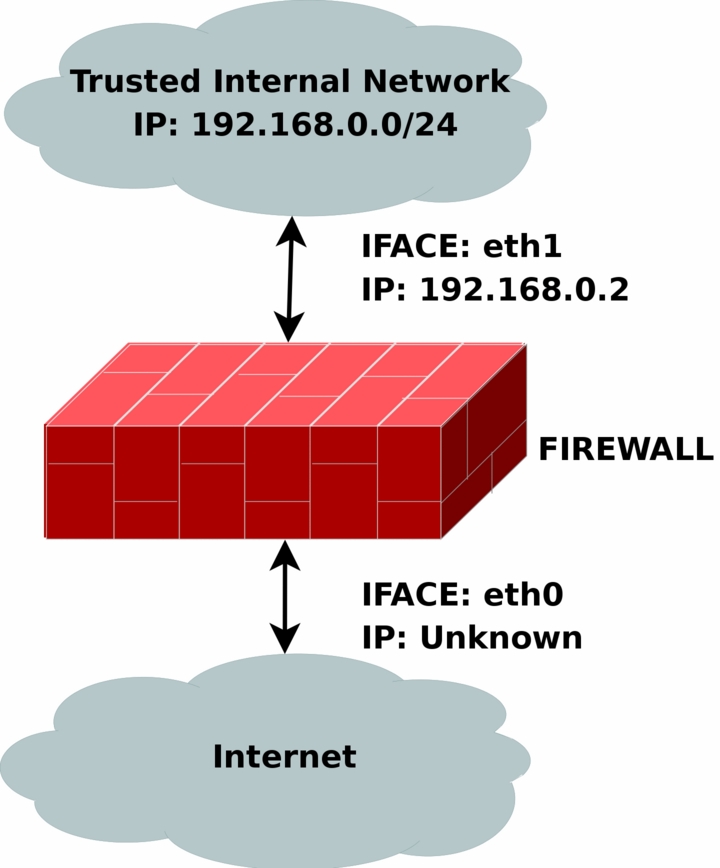
The rc.DHCP.firewall.txt script is pretty much identical to the original rc.firewall.txt. However, this script no longer uses the STATIC_IP variable, which is the main change to the original rc.firewall.txt script. The reason is that this won't work together with a dynamic IP connection. The actual changes needed to be done to the original script are minimal, however, I've had some people mail me and ask about the problem so this script will be a good solution for you. This script will allow people who uses DHCP, PPP and SLIP connections to connect to the Internet.
The rc.DHCP.firewall.txt script requires the following options to be compiled statically to the kernel, or as modules, as a bare minimum to run properly.
-
CONFIG_NETFILTER
-
CONFIG_IP_NF_CONNTRACK
-
CONFIG_IP_NF_IPTABLES
-
CONFIG_IP_NF_MATCH_LIMIT
-
CONFIG_IP_NF_MATCH_STATE
-
CONFIG_IP_NF_FILTER
-
CONFIG_IP_NF_NAT
-
CONFIG_IP_NF_TARGET_MASQUERADE
-
CONFIG_IP_NF_TARGET_LOG
The main changes done to the script consist of erasing the STATIC_IP
variable as I already said and deleting all references to this variable. Instead
of using this variable the script now does its main filtering on the variable INET_IFACE. In other words -d $STATIC_IP has been changed
to -i $INET_IFACE. This is pretty much the only change made and that's all that's
needed really.
There are some more things to think about though. We can no longer filter in the
INPUT chain depending on, for example, --in-interface $LAN_IFACE --dst $INET_IP.
This in turn forces us to filter only based on interfaces in such cases where the
internal machines must access the Internet addressable IP. One great example is
if we are running an HTTP on our firewall. If we go to the main page (i.e., http://192.168.0.1/),
which contains static links back to the same host (i.e., http://foobar.dyndns.net/fuubar.html),
which could be some dyndns solution, we would get a minor problem. The NATed box
would ask the DNS for the IP of the HTTP server, then try to access that IP. In
case we filter based on interface and IP, the NATed box would be unable to get to
the HTTP because the INPUT chain would DROP the packets flat to the ground. This
also applies in a sense to the case where we got a static IP, but in such cases
it could be gotten around by adding rules which check the LAN interface packets
for our INET_IP, and if so ACCEPT them.
As you may read from above, it may be a good idea to get a script, or write one, that handles dynamic IP in a better sense. We could for example make a script that grabs the IP from ifconfig and adds it to a variable, upon boot-up of the Internet connection. A good way to do this, would be to use, for example, the ip-up scripts provided with pppd and some other programs. For a good site, check out the linuxguruz.org iptables site which has a huge collection of scripts available to download. You will find a link to the linuxguruz.org site from the Other resources and links appendix.
|
|
This script might be a bit less secure than the rc.firewall.txt script. I would definitely advise you to use that script if at all possible since this script is more open to attacks from the outside. |
Also, there is the possibility to add something like this to your scripts:
INET_IP=`ifconfig $INET_IFACE | grep inet | cut -d : -f 2 | \
cut -d ' ' -f 1`
The above would automatically grab the IP address of the $INET_IFACE variable, grep the correct line which contains the IP address and then cuts it down to a manageable IP address. For a more elaborate way of doing this, you could apply the snippets of code available within the retreiveip.txt script, which will automatically grab your Internet IP address when you run the script. Do note that this may in turn lead to a little bit of "weird" behavior, such as stalling connections to and from the firewall on the internal side. The most common strange behaviors are described in the following list.
-
If the script is run from within a script which in turn is executed by, for example, the PPP daemon, it will hang all currently active connections due to the NEW not SYN rules (see the State NEW packets but no SYN bit set section). It is possible to get by, if you get rid of the NEW not SYN rules for example, but it is questionable.
-
If you got rules that are static and always want to be around, it is rather harsh to add and erase rules all the time, without hurting the already existing ones. For example, if you want to block hosts on your LAN to connect to the firewall, but at the same time operate a script from the PPP daemon, how would you do it without erasing your already active rules blocking the LAN?
-
It may get unnecessarily complicated, as seen above which, in turn, could lead to security compromises. If the script is kept simple, it is easier to spot problems, and to keep order in it.
rc.UTIN.firewall.txt |
Page Up |
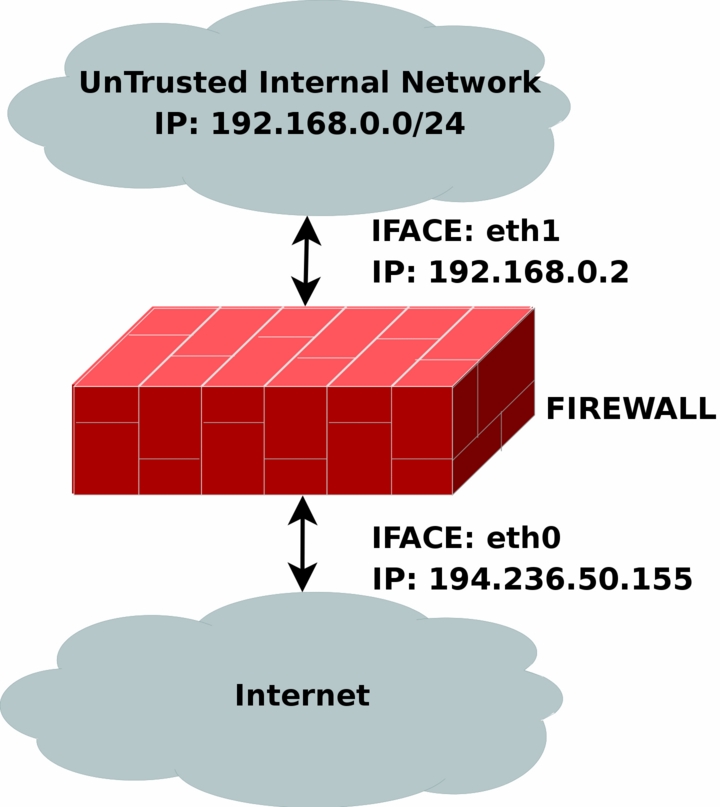
The rc.UTIN.firewall.txt script will in contrast to the other scripts block the LAN that is sitting behind us. In other words, we don't trust anyone on any networks we are connected to. We also disallow people on our LAN to do anything but specific tasks on the Internet. The only things we actually allow are POP3, HTTP and FTP access to the Internet. We also don't trust the internal users to access the firewall more than we trust users on the Internet.
The rc.UTIN.firewall.txt script requires the following options to be compiled statically to the kernel, or as modules. Without one or more of these, the script will become more or less flawed since parts of the script's required functionalities will be unusable. As you change the script you use, you could possibly need more options to be compiled into your kernel depending on what you want to use.
-
CONFIG_NETFILTER
-
CONFIG_IP_NF_CONNTRACK
-
CONFIG_IP_NF_IPTABLES
-
CONFIG_IP_NF_MATCH_LIMIT
-
CONFIG_IP_NF_MATCH_STATE
-
CONFIG_IP_NF_FILTER
-
CONFIG_IP_NF_NAT
-
CONFIG_IP_NF_TARGET_LOG
This script follows the golden rule to not trust anyone, not even our own employees. This is a sad fact, but a large part of the hacks and cracks that a company gets hit by are a matter of people from their own staff perpetrating the hit. This script will hopefully give you some clues as to what you can do with your firewall to strengthen it. It's not very different from the original rc.firewall.txt script, but it does give a few hints at what we would normally let through etc.
rc.test-iptables.txt |
Page Up |
The rc.test-iptables.txt script can be used to test all the different chains, but it might need some tweaking depending on your configuration, such as turning on ip_forwarding, and setting up masquerading etc. It will work for most everyone who has all the basic set up and all the basic tables loaded into kernel. All it really does is set some LOG targets which will log ping replies and ping requests. This way, you will get information on which chain was traversed and in which order. For example, run this script and then do:
ping -c 1 host.on.the.internet
And tail -n 0 -f /var/log/messages while doing the first command. This should show you all the different chains used, and in which order, unless the log entries are swapped around for some reason.
|
|
This script was written for testing purposes only. In other words, it's not a good idea to have rules like this that log everything of one sort since your log partitions might get filled up quickly and it would be an effective Denial of Service attack against you and might lead to real attacks on you that would be unlogged after the initial Denial of Service attack. |
rc.flush-iptables.txt |
Page Up |
The rc.flush-iptables.txt script should not really be called a script in itself. The rc.flush-iptables.txt script will reset and flush all your tables and chains. The script starts by setting the default policies to ACCEPT on the INPUT, OUTPUT and FORWARD chains of the filter table. After this we reset the default policies of the PREROUTING, POSTROUTING and OUTPUT chains of the nat table. We do this first so we won't have to bother about closed connections and packets not getting through. This script is intended for actually setting up and troubleshooting your firewall, and hence we only care about opening the whole thing up and resetting it to default values.
After this we flush all chains first in the filter table and then in the NAT table. This way we know there are no redundant rules lying around anywhere. When all of this is done, we jump down to the next section where we erase all the user specified chains in the NAT and filter tables. When this step is done, we consider the script done. You may consider adding rules to flush your mangle table if you use it.
|
|
One final word on this issue. Certain people have mailed me asking me to put this script into the original rc.firewall script using Red Hat Linux syntax where you type something like rc.firewall start and the script starts. However, I will not do that since this is a tutorial and should be used as a place to fetch ideas mainly and it shouldn't be filled up with shell scripts and strange syntax. Adding shell script syntax and other things makes the script harder to read as far as I am concerned and the tutorial was written with readability in mind and will continue being so. |
Limit-match.txt |
Page Up |
The limit-match.txt script is a minor test script which will let you test the limit match and see how it works. Load the script up, and then send ping packets at different intervals to see which gets through, and how often they get through. All echo replies will be blocked until the threshold for the burst limit has again been reached.
Pid-owner.txt |
Page Up |
The pid-owner.txt is a small example script that shows how we could use the PID owner match. It does nothing real, but you should be able to run the script, and then from the output of iptables -L -v be able to tell that the rule actually matches.
Recent-match.txt |
Page Up |
The recent-match.txt script is a small example of how the recent match can be used. For a complete explanation of this script take a look at the Recent match section in the Iptables matches chapter.
Sid-owner.txt |
Page Up |
The sid-owner.txt is a small example script that shows how we could use the SID owner match. It does nothing real, but you should be able to run the script, and then from the output of iptables -L -v be able to tell that the rule actually matches.
Ttl-inc.txt |
Page Up |
A small example ttl-inc.txt script. This script shows how we could make the firewall/router invisible to traceroutes, which would otherwise reveal much information to possible attackers.
Iptables-save ruleset |
Page Up |
A small example script used in the Saving and restoring large rule-sets chapter to illustrate how iptables-save may be used. This script is non-working, and should hence not be used for anything else than a reference.
What's next? |
Page Up |
The chapter you have just read basically gave you a brief overlook of all the different scripts that are available with this tutorial and the basic idea that they are trying to bring across to you. Hopefully it has been able to explain something at the very least.
The next chapter will discuss some different graphical user interfaces that are available for iptables and netfilter. This is far from a complete listing of all the different interfaces available, but as you can see, there are quite a lot of othem. These interfaces mostly tries to simplify creating iptables scripts for you, and for simple setups they are more than enough most of the time. At other times, you may have higher and more complex needs and you must have to write your own script none the less.
| Hosted by HB.BY | 2008 © iptables.info |